Showing posts with label Decorating Home. Show all posts

Sunday, March 27, 2011

Spring Bouquet

I love this time of year, spring time! It's getting nice out, gardens are being planted, and flowers are coming out.  I have really loved playing with fabric flowers and I wanted to make a flower bouquet that I could have out all spring long.  So I was searching for some inspirations and I come up with this idea.  I found the inspiration here.


Here is what I did.  I bought a 4 inch planting pot and a half circle styrofoam form.  


I used scrap fabric that I already had in spring colors.  I cut the fabric into 2 inch strips.  The longer the strip the bigger the flower.  I used varying lengths to give each flower a different shape. I decided not use the white when I was done. 

To make each flower fold the fabric in half and iron.  Then baste stitch on the selvage ends.  If you want a fray effect like I did for this project here don't fold the fabric in half so the ends fray when you are done. 


When you are done stitching pull on the thread and you will get this.


Here is the fun part, forming the flower! Circle the fabric around each other and shape it into the flower you want.  Stitch it together a couple of times and then add a button or a bead for the center.  Once I had a couple of flowers made I pinned them to my styrofoam form. 


I used pins to keep the flowers in place so I can move them around if necessary. When I was done this is what I had.


I then of course glued some ribbon around the top and I was done.  I had a pretty spring bouquet for my table. 


Things I love about this project. 
I love fabric flowers because there is no wrong way to make them, no flower is the same so it doesn't have to be perfect.  I also love using scrap fabric because it reminds me of what I used the fabric for in the first place.  The blue was used as binding for my first  quilt I ever made, the green was lining for one of my many bags, and the pink I used for decorating a guest book for my best friend's wedding this summer.  

Happy Spring Time!!

Sunday, March 13, 2011

Bird Coasters

I love birds, and I love using them in my crafties.  We were watching Portlandia and they had a skit on that was all about me (see clip in post Put a bird on it).  I was laughing so hard because I had this idea about making coasters with birds on them.

I bought 4 ceramic tiles from Home Depot for 16 cents each, I was very happy about the price! I got rubber adhesive circles to attach to the bottom to prevent skidding.  I picked out some blue paint, and got my bird stencil and got to work.


I lightly traced the stencil on the tile with a pencil.  I used a thin brush to outline it and then filled it in.  I did the same picture on all 4 tiles for simplicity reasons.  I wanted a silhouette of a bird so it would be easy to hide mistakes.  I have limited experience painting, so the simpler the better for me. 

Once they were dry I added the rubber circles on the bottom. 


That was it, I had four new bird coasters to add to my bird collection.


Saturday, March 5, 2011

Vintage Fun

I love love love vintage things! I especially love vintage objects that were used for everyday life, 
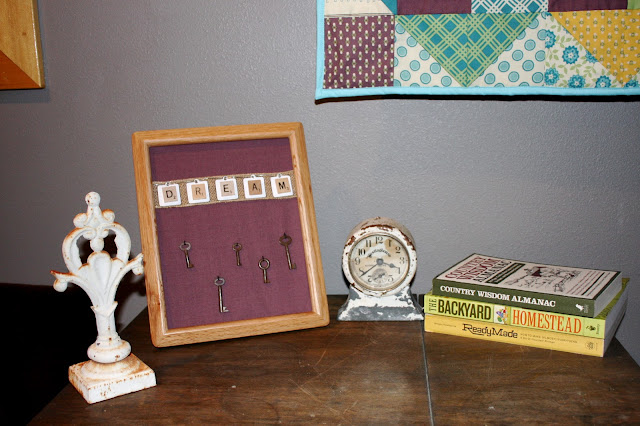
keys are some of favorites.  A friend of mine, Kelly, found me some keys while she was out antiquing.  When I saw them I knew just what crafty I was going to do.  Kelly and I were out looking for some more great finds and I got an old clock, a fence post cap, and some great burlap ribbon (I have never seen burlap ribbon but my house will soon be covered with it).  

 I took my wonderful keys and my great ribbon and I made a little sign.  I had an 8 x 10 picture frame and I used that as my back drop.  I covered it with purple fabric and went from there. 


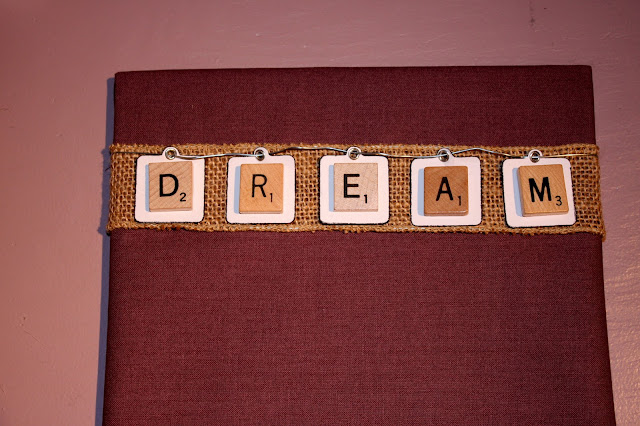
I had some scrabble tiles that spelled "dream" and thought those would be great with the keys.  I used my die-cut machine and cut square tags to frame the tiles.  I took a black ink pad and stamped the edges of the tags, it gives it a vintage style. I then added an eyelet. 


I glued the tiles down on the paper and glued them to the burlap ribbon.  At the last minute I decided to string some wire through the eyelets, I'm glad I added it! I then secured the banner to the fabric with some hot glue. 


All that was left was to sew the keys to the fabric.  I played around with lots of different layouts and then just finally started attaching them.  I used thick black embroidery floss to make sure it lasted.  I put my new sign in my old frame and I was done!!


I set my sign next to my new treasures in my living room.  It's a happy little reminder to dream everyday!

Thursday, February 24, 2011

Picture Frame Makeover

I love having pretty things on my walls.  I had a great picture of my husband and I on a small wall in the living room.  The wall was a little plain for my liking so  I made some art to surround.  


I bough eightt 4 x 6 unfinished wood picture frames from Michael's and painted them white.

I wanted to put pictures in a few but I needed some texture in my living room as well, so I framed a couple different things.
A friend gave me this star for Christmas a while ago, it says wishes on it, and I love it! I glued some fabric down and then framed it. 


I love anything vintage! I had this key that was on a necklace friends got me for my birthday one year.  I stitched it to some fun fabric and framed it. 


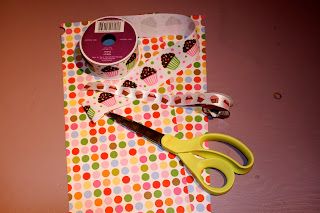
No project of mine would be complete without some ribbon. 


This one is fun because it was the cake topper (on our giant cupcake) at our wedding.  I took some yarn and stitched it to some fabric and glued the eggs down. 


I have been playing with fabric flowers lately and I really like this technique.  It frays a little and I enjoy the style.  The background fabric matches a seat cushion on the bench in my living room.  

I put in a few of my favorite pictures and I was all done!


Before


After

Sunday, February 13, 2011

Laundry Room

My laundry room was in much need of a makeover! I had some cute shelves that my husband had made me that needed some paint, baskets that needed some color, and a bare wall that needed some art.

I painted the shelves white first thing this morning so they could dry.  I gathered some paper and made labels for the baskets.  Layering paper gives it a more finished look.


I made a sign to hang above to add some color to the wall.  I again layered the paper for the letters to give it more depth.


 I love the finished look! It brightens the laundry room and adds some much needed color.


It's amazing what I can do in one afternoon.

Monday, January 31, 2011

Two Uses for Tea Towels

1)
I love cute tea towels! I'm so fortunate enough that my Grandma makes me tea towels every year.  For our wedding she made us a cute set with dishes on them,  I wanted to have them displayed all the time. I decided to make curtains out of them for the kitchen.
There was no sewing involved, that way I can change them whenever I want.  I folded the towels to the desired length and then ironed a nice crease.  I used cafe curtain clips to attach them to the curtain rod.
The whole process took about 20 minutes and I get to enjoy my Grandma's work everyday!!

2)
It is no secret that I love to be organized.  I have so many baskets around the house for different stuff.  I needed a liner for a square basket that could be easily washed.  I took my all time favorite towels and folded one over each side of the basket to get the right size, then I ironed them to keep the size.


I put grommets in each corner and tied each corner with a different ribbon bow to hold them in place.
 When the towels get dirty I just untie the bow and throw them in the washer.  I not only love how these two projects look, but I love that my Grandma's towels are used.

Monday, January 17, 2011

Have a Seat!

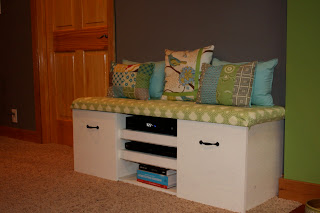
Our house is cozy, well it's small, and I love it that way!  I'm all about getting the most out of things, including furniture.  I try to use furniture that can work double duty.  We needed more seating in our living room so I designed a bench that would work as a seating option, hold our cable box and blue ray player, and have drawers for storage.  I drew the plans, and one week later Jeremy had it made!

I used an old foam mattress for the cushion and found some pretty fabric for the cover. I made the throw pillows to add some color.  I love this bench, it fits right in our cozy home.

We also needed something in the entry way for storage, so again I designed a bench that could also be used as storage.
 I used the same foam mattress for this seat and covered it with burlap.  The bins are from Ikea, I attached chipboard letters for the labels.  My favorite part about this bench is the top lifts up for hidden storage.

I painted both benches white and made replaceable cushions and pillows so I could change colors if I wanted in the future.  Hope you can come over and have a seat in our cozy home.

Saturday, January 15, 2011

A Place For Everything

I love to be organized and in my mind everything has a place.  I needed a cute system for my jewelry, and I found this idea in a DIY magazine.  


I bought a piece of old wood at an antique mall in town for $1.00.  For my earrings I bought drawer pulls and hung them upside down.  This gives me a place for hanging earrings as well as an area to put things in.  The hooks for my necklaces and bracelets are key hooks from a hardware store.  I love this project because it is useful and pretty to look at!


Home Sweet Home


I have multiple signs in my house that simply say "home" I take this to mean that I really love my home.  I covered wooden letters with paper and then added other decorations to jazz it up. The H is my favorite with the little ribbon bows.  It was super simple and took no time at all.  The possibilities are endless with this project.